oAuth2 Down to the Bare Metal
You should by now have already seen the many diagrams depicting the control flow between client and web servers during a typical oAuth authentication process, something like this:
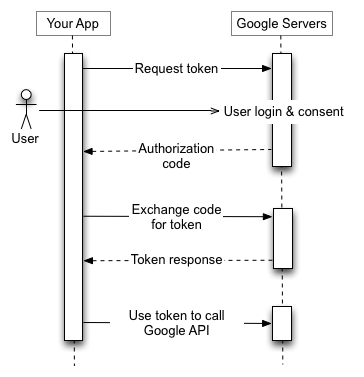
Perhaps you understood those perfectly. If not, this page gives a low-level explanation of the actual Http transactions that take place. A Google example is used.
The Configuration
As in any use of authentication providers, you must first set up such a service at the provider. For Google, you need to enable a set of credentials under APIs & Services at the Google Developers Console. The credentials is a Client ID-Client Secret pair, like this:

Request Authorization
When your web site wants to make use of Google log in, it has to redirect the user to a Google page: https://accounts.google.com/o/oauth2/v2/auth, with the following query string parameters:
response_type:codeclient_id: the Client IDredirect_uri: the url for Google to send the user to after he has successefully logged in to Google. It has to be one in the list of Authorized redirect URIs you configured under credentials creation at the Google Developers Console.scope: the information of the user you want to retrieve from Google. An example would beemail profileprompt:select_account
More detailed information on the various parameters can be found in Google's documentation.
The query string has to be appropriately UrlEncoded of course.
You can try it out with your own Client ID or use my test site: https://accounts.google.com/o/oauth2/v2/auth/oauthchooseaccount?response_type=code&client_id=160774382559-5f24lsv2fkmqic9o3dmq71pnvb1skmha.apps.googleusercontent.com&redirect_uri=http%3A%2F%2Flocalhost%3A8080%2Flogin%2Fgoogle%2Freturn&scope=email%20profile&prompt=select_account&service=lso&o2v=2&flowName=GeneralOAuthFlow.
Unfortunately, you cannot log in with the above as Google has now blocked oAuth unless the site has gone through verification approval. To test yourself, set up your own oAuth credentials at the Google Developer Console and simply substitute the Client ID in the above url with yours.
The above example specifies http://localhost:8080/login/google/return as the redirect_uri. It is the location that Google will redirect the user to after he has successfully signed in to Google and agreed to sharing the information you have requested in scope. You should have a web application listening at the specified location to receive the response from Google. The redirect_uri has to set up in the Google Developers Console.
The oAuth Server's Response
When the user successfully logs into Google, Google sends the user to the request_uri with the following query string parameters:
authuser:code:prompt:scope:email profile https://www.googleapis.com/auth/userinfo.email https://www.googleapis.com/auth/userinfo.profile openid
Confusion Note: The response is a Http GET reqest, and the response data we are interested in is in the query string of the request!
code is a very short-lived security value that you will need to request for an access token in the next step.
Note that up to this point, any application in the world can make a request for authorization using anyone's Client ID. Google still does not have the identity of the requesting application.
Get Access Token
In this step, your application now makes a request to Google for an access token. The access token is a security value that you need every time you want to request information about the user.
The url to get the access token is https://www.googleapis.com/oauth2/v4/token. It accepts a Http POST request with the following url-encoded parameters in the body:
grant_type:authorization_coderedirect_uri: Needed, but I don't know whyclient_id: the Client IDclient_secret: the Client Secret as seen on the Google Developers Consolecode: the value returned in the previous step
The response is a JSON object with the access_token like shown below:
  {
    "access_token": "ya29....................163",
    "expires_in": 3599,
    "scope": "openid https://www.googleapis.com/auth/userinfo.email https://www.googleapis.com/auth/userinfo.profile",
    "token_type": "Bearer",
    "id_token": "eyJhbGciOi ................. IfRg"
  }
Get User Info
To get the user's information in Google, simply call https://www.googleapis.com/oauth2/v3/userinfo with the folliwng query string:
access_token: the value from the previous step.
The response is a JSON object like follows:
  {
    "sub": "123456789012345678901",
    "name": "User Name",
    "given_name": "User",
    "family_name": "Name",
    "picture": "https://lh3.googleusercontent.com/a/AGNmyxYAWbwO9t9e1jUSPqudu78Kk28HhHKWakF1Q53JSs0=s96-c",
    "email": "username@gmail.com",
    "email_verified": true,
    "locale": "en"
  }
Conclusion
I hope you find the above details of interest and they provide you with the ah-ha on how oAuth works.
Comments
Post a Comment